Forum
WARNING:This product contains nicotine. Nicotine is an addictive chemical.
Launch Time: 2017-04-06 Views: 3194 Rely: 0 Started by:
In the last chapter, we have mentioned some tips to build your coil, in this one, we will continue!
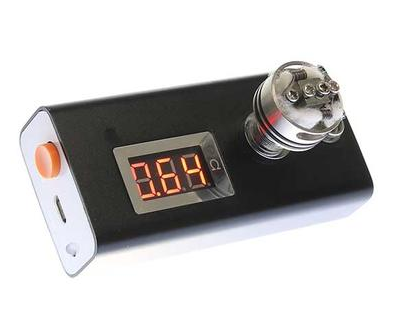
Testing Your Coil For Shorts
Next you will want to take your RDA and screw it on to your ohms reader and turn it on to be sure the new coil on your RDA doesn’t have a short. It should measure close to your target resistance of 1.2 ohms but it is important to remember it is quite common and normal for coils to have a slight variance in resistance of up to .2ohms. If your coil is displays the proper resistance within .2ohms you are ready to move on to the next step. However if your ohms reader is not reading your coil or displays a resistance more than .2 ohms different than your target resistance there is a problem that needs to be fixed. Usually issues are easily fixed. Check to be sure your RDA’s post screws are tight. Check your coils positioning to make sure it isn’t touching the deck or posts. Be sure your atomizer is screwed completely into the ohms reader. If these steps corrected your problem you are ready to move on to the next step. If those steps did not correct your problem try making another coil. If you continue to have an issue there might be a problem with your atomizer or with your ohms reader.
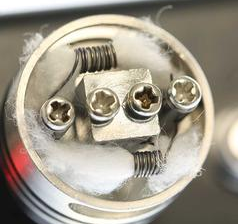
Test Firing Your Coil and Eliminating Hot Spots
Now that we have made sure your coil is installed properly and there are no shorts, you are ready to put your RDA on to your mod. Once your RDA is installed onto your mod you will want to briefly fire your mod until the coil begins to glow. Once your coils begin to glow stop firing your mod and gently squeeze your coil together with your tweezers. Repeat this process until the coil glows evenly starting from the center moving towards the outer wraps.
Wicking Your Coil
There are many things you can use to wick your coil, organic cotton, silica wick, eko-wool (silica braided around cotton) are all very popular for different reasons and uses. For this purpose we prefer organic cotton for its superior flavor and wicking abilities. You will want a piece of material just big enough to snugly fit inside your coil leaving about half an inch on either side. It sometimes helps to wet and twist the end of your wick to get it started. Push it in from one side of the coil and pull it out the other side. If It doesn’t go through easily you likely are using to much material for your wick. On the other hand if your wick is sliding loosely inside the coil there is not enough material. Once your wick is threaded though the coil take the wick sticking out of each side and trim them so they are just long enough to be folded over to sit on the deck of your RDA. Once your wicks are trimmed wet them with a few drops of e-juice and fold them on to the RDA deck paying mind not to push them underneath the coil so air can reach the entire coil.
Test it again!
After wicking your coils it is likely they were pushed on or moved around a little. It is important to recheck your RDA’s post screws are tight. Then recheck your resistance on an ohms meter. Be aware it is possible that your resistance might have changed slightly +/- .2ohms but this is normal. If everything checks out you are ready to move on to the next step. If there is a problem you will need to recheck everything working your way backwards until you find the problem.
Vape and Enjoy!
You have successfully built a 1.2ohms single coil for your RDA. Saturate your wicks with your favorite e-juice, replace your RDA’s cap, vape and enjoy! You deserve it!
Dual Coils
We said we would teach you to build .6 ohms dual coils too, but you already know how. When you are using dual coils you are creating a second path for electricity to follow which cuts the resistance in half. For example 1.2ohms / 2 = .6ohms. Simply make and install 2 of the 1.2 ohms coils we just made. Be sure to make the coils as close to identical as possible. Try to install and position them similarly. When test firing your dual coils they should fire at about the same time and glow evenly if one glows brighter than the other check your screws. If it continues to glow unevenly try squeezing the coil that glows brighter with your tweezers. Let it cool then test fire again. Repeat until they glow evenly outward from the center. Wick them similarly. Vape and enjoy!
It is important to note when building or rebuilding your own coils it is absolutely crucial to know the limits of your device, hardware, and batteries. Never build at resistances that will exceed their safe operating capacity. For more information on this please see our tutorial on Battery Selection and Vaping Safety. Exposed coils when installed and fired on your device are very hot please exercise caution. If you do not have an ohms reader please do not attempt to rebuild your own coils.


